Friday, November 29, 2013

Happy Thanksgiving!!!


Above is a picture of me in Boston with my brother, Craig,  (in the chef's coat) and sister, Cecilia, with her husband, Rich. We had a fabulous Thanksgiving. My brother is a wonderful chef at home, an entrepreneur at work. With friends and family, we prepared and ate mulled cider, two turkeys, corn casserole, mashed potatoes, sweet potatoes, stuffing, acorn squash, two gravies, green beans, broccoli with pasta, sweet potato pie, pumpkin pie, apple pie and rice pudding. I'm STILL full!!!

I am so glad I made the trip! We had a wonderful Thanksgiving together yesterday and have spent today relaxing at a luxury movie theater while watching the sequel to Hunger Games, and then relaxing at Craig's house in front of the fire. The only thing missing is my two sons, Chris and Coleman. They are many, many miles away, working and sharing the holiday with their friends. I don't think anybody should have to work on Thanksgiving!!!

Thank you for stopping by! I appreciate your visits more than you know, and I hope you, too, had a wonderful Thanksgiving with family and friends. There's nothing like it!

Monday, November 25, 2013

Harvest of Wishes

This week I'm taking a step back and thinking about gratitude instead of Christmas. Thanksgiving is in a few days, and with the upcoming storm I'm not sure I'll be able to be with family as expected. Whether I am with them or not, I do have a "harvest of wishes" for each of them during this holiday season, bundled up with a whole lot of love!

Thanks for stopping by, and just in case I don't get another card posted in the next day or two, may you have a blessed Thanksgiving holiday!

Saturday, November 23, 2013

Christmas Joy

This has got to be one of my favorite Christmas cards this year. I used Rupa Shevde's Christmas Joy stamp set from Gina K Designs. The image and sentiment are heat embossed in gold and layered onto ivory chocolate brown cardstock before placing on an ivory card base. You can see one layer is embossed with a dotted embossing folder.

I hope you like this card as much as I do. It seems to be very elegant, so I will save it for someone extra special...or maybe keep it as an example for myself before I make more.

The weekend is passing by, so get busy and have some fun! Before you go, don't forget to leave a comment to let me know you were here. I love reading what you have to say, and it sure helps motivate me to continue on this creative journey!

Cheers!

I created this card using Gina K Design's Cheers stamp set. I heat embossed the image and sentiment in white embossing powder, then layered onto ivory cardstock after adding a piece of ribbon across the front. The patterned paper is also from Gina K Designs, included in the Seasons Greetings Stamp TV kit along with the cranberry base layer cardstock. This card is so pretty. Embossing the image and sentiment in ivory ink would have worked as well.

Thank you for stopping by! I hope you are having a good weekend. Please don't forget to leave a  comment before you go--I appreciate it very much!

Holiday Card Workshop 2013 Day 6


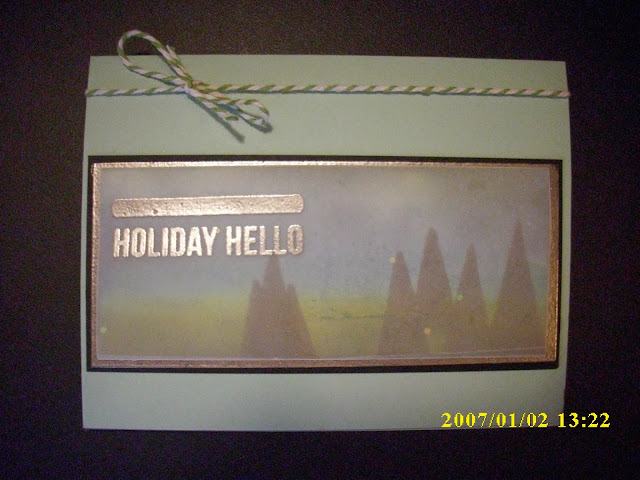
So sorry for the bad photo. The weather is terrible today and it's hard to get good daylight.

This card was created for the last day of Holiday Card Workshop 2013. Following Kristina Werner's video lesson, I created a scene using trees from Stephanie Barnard's Stamps of Life after sponging on some Tim Holtz Distress inks. Finally, I layered a piece of vellum over top that had the sentiment heat embossed in silver.

Thanks for stopping by today. I hope you are having a wonderful weekend. This is the end of the Holiday Card Workshop 2013, but of course I won't stop creating cards! You can be sure I'll be taking more Online Card classes in the future and following other videos in the meantime. Have a good day!

Friday, November 22, 2013

More Holiday Cards

 Here are two cards I created with the Season's Greetings Stamp TV kit from Gina K Designs. I absolutely love this kit! There are so many wonderful, big stamps that offer endless possibilities for holiday cards!

I created these cards following videos by Gina K at Gina K Designs. She is a wonderful teacher and mentor, and very easy to follow. Her products are top quality all the way. I highly recommend her. Check out her site at stamptv.ning.com.

Thanks for coming by today! I appreciate your visit, and appreciate your comments even more! Have a good weekend!

Holiday Card Workshop 2013 Day 5 Part 2

This is the second card created for Holiday Card Workshop 2013, Day 5, where we created cards for males and females. This one is more feminine in that I added more color and ribbon.


I used the same snowflake stamp but heat embossed it in white this time rather than silver. I also kept the die cut snowflakes in white. I also heat embossed the sentiment in white after adding the ribbon.

Thanks for stopping by! I hope to see you again soon! Take it easy, and don't forget to leave a comment before you go! They mean the world to me and keep me motivated for continuing on this creative journey. Have a good weekend!

Holiday Card Workshop 2013 Day 5

Today's class was about His and Her Holiday cards. I will show you the masculine card here.

First I heat embossed a snowflake in silver, then die cut two snowflakes in white before heat embossing them in silver. Covering them in silver embossing powder was a bit tricky, but holding onto them while using the heat gun was even worse! I finally accomplished the task for both snowflakes, then used wet glue to adhere them to the layer of silver paper. I also heat embossed the sentiment before layering them onto Gina K Design's Red Hot cardstock. Finally, I put all that on top of a base layer of white cardstock.

Thank you for stopping by today! The next post will have feminine card. As always, I appreciate your comments very much. You keep me going on this creative journey!

Tuesday, November 19, 2013

Season's Greetings 3

I think this is one of my favorites from the Stamp TV Season's Greetings kit. The coffee mugs are stamped in Gina K Design's Warm Cocoa ink and layered on patterned paper. There are several layers to this card, but I think it looks pretty good. Kind of makes you want to go fix a cup of warm cocoa, doesn't it?

Thank you for stopping by! I appreciate your comments -- they are true motivators to keep me moving forward on this creative journey. Hope to see you again soon!

Season's Greetings 2

Here's another card I created while following one of Gina K Design's Stamp TV videos. I used a stamp from the Season's Greetings Stamp TV kit, which is full of (mostly) large stamps, cardstock, designer patterned paper and ribbon.

Thank you for stopping by! As always, your comments are always motivating for me, and I appreciate your kind words. Hope to see you again real soon!

Season's Greetings 1


This card was quite a challenge! The outside was easy, but the inside took me all afternoon. It has an inside layer with two cut layers inside of that, then it has layered pieces across the top and bottom. All of this was made with the Gina K Design's Season's Greetings Stamp TV kit, which was my early Christmas present to myself. I have never purchased a Stamp TV kit before, and now I know what I've been missing. There are lots of stamps, which are mostly big, and also has designer patterned paper, cardstock, ribbon and brads.

This card was created following one of Gina K's instructional videos, which you can find on the Stamp TV site (stamptv.ning.com/video). She is very thorough in her demonstration, and you will learn a lot if you check it out.

Thank you for stopping by! I have two more cards I created from this kit, so far. There will be more! I appreciate your comments very much, and I look forward to seeing you again soon!

Monday, November 18, 2013

Day 4, Final

Here's my last, final card for Day 4 of Holiday Card Workshop 2013. Aren't you glad? I've bombard you with holiday cards, haven't I? Good thing we have one day in between classes or else you'd really be overwhelmed!


Following Kristina Warner's video, I used the back of a long stamp, hoping it would give me one long solid stripe. Well, that obviously didn't happen! It has dots all over it! Oh, well. I went ahead with it anyway. I used the same Memento Luxe inks (which are rather thick) that she used but in different colors. Then I took a stamp from Stephanie Barnard's Stamps of Life and stamped the love birds, with a heart in between. Unfortunately, the ink smeared a little bit on the bird's feet, but I chose to continue despite that error. Hope it's not REAL obvious! Maybe the bird is moving his feet, you think? I can hope!

Thank you for continuing to visit. If this is your first visit, I appreciate seeing you here! Comments are more than welcome. I love reading what you have to say -- I learn from your words and always hope to improve as I continue on this creative journey. Have a wonderful day!

Day 4, Yet Again!

Here's my the third card I created today:


This is my least favorite of those I made today, but I followed instructions given by Shari Carroll. She was on a roll today, giving us two videos with multiple cards each! She was hard to keep up with, but she did teach me more about how to "Stretch Your Holiday Stamps" which was the title of today's class. I used stamps from Stephanie Barnard's Stamps of Life, colored them in with Stampin Up! markers, then stamped my sentiment on two pieces of paper, just as Shari showed, before layering them onto a red piece of paper and adding gems. I think I'd like this better if the sentiment was not split like that, but I followed directions and did it this way. I'll probably add either Glossy Accents or Stickles to the Christmas lights to make them glisten.

Thanks for stopping by! I enjoy your visits very much and really like your comments! Please come back again soon. I'll be lookin' for you!

More of Day 4

Here's another card from Day 4:

This is similar to the card with the reindeer, but this time I heat embossed the sentiment in silver first, THEN I added the trees on top using Hero Arts Shadow Inks from Simon Says Stamps. I was surprised the trees didn't cover up the sentiment! In fact, I was so sure of it I almost didn't stamp on top of "rejoice" because I was afraid I'd cover it up! Well, what do you know? You can still see it, just fine! After getting over that surprise, I added Washi Tape at the top and Baker's Twine at the bottom. Shari Carroll's instructional video was easy to follow, and I enjoyed creating while watching & listening to her demonstrate.

Thanks for coming by (again)! I sure do appreciate your visit, and I hope you'll leave a comment before you go. That's important to me, and your words keep me motivated to attend yet another day of class on Wednesday! Hope you're having a good Monday!

Holiday Card Workshop Day 4

Today's Holiday Card Workshop was about Stretching Your Holiday Stamps. The image on this card, from Gina K Design's, was inked first in Gina K Design's Honey Mustard ink. Then, I heat embossed the sentiment (from same stamp set) in silver on top of the image. I cut this out, rounded two of the corners, added twine, then placed on top of one strip of burlap ribbon and two strips of Washi tape. I like this card a lot, and it was fun to create, following Shari Carroll's instructional video. She's quite creative and is wonderful at putting multiple layers on her cards.

Thanks for stopping by. I have three more cards from today that you can see under separate headings. I am enjoying this class immensely, although I know I'm flooding you with many, many holiday cards! Just hang in there with me, and before you know it  I'll be moving on toward Valentine's Day cards! Can you imagine?

I enjoy your comments a lot, and I thank you very much for stopping by. Your words are very inspiring, and they motivate me to continue on this creative journey. Have a good Monday!

Sunday, November 17, 2013

I Copied!

I found a card in the Gallery at OCC's Holiday Card Workshop 2013, Day 3, that I just love, so I had to COPY it for myself! Thank you, Jen D, whoever you are--from class, I know that) for the opportunity to see and then try such an awesome card. This is so elegant and lovely!

I dry embossed white cardstock with a snowflake embossing folder, leaving the middle part blank at an angle. It didn't make a very deep impression toward the bottom left, but next time I'll remember that and do it differently. The middle has a strip of cranberry cardstock, then another white layer, heat embossed with the sentiment. I just love this!!! It's so crisp and clean. I think this is another one I'd be happy to reproduce in multiples.

Thanks for stopping by again. I know I'm flooding you with cards right now, but the class has kept me very busy trying new things, and I'm not about to stop now! (Just a warning there...) Hope you had a good weekend, and I hope to see you again soon!

Holiday Card Workshop Day 3 Again


Here's a card I hesitated to make. Shari Carroll did an excellent job demonstrating this, but it has so many elements I felt almost too overwhelmed to create it. By today (Sunday), I finally caved and gave it a shot.

I absolutely love this glitter paper. Like I've said before, it's so flexible yet durable it's feels almost like soft plastic, although it is very easy to cut with my trimmer. The window that's cut out is made from a die from Stephanie Barnard's Stamps of Life. The sentiment is a stamp from Gina K Designs. If you've checked out my previous cards, you'll realize these are my two favorite places to find good, quality products.

Thanks for checking this out. This was definitely a card that took me way out of my comfort zone, but I'm glad I tried it. I appreciate your comments very, very much, and I hope you'll come back soon!

Holiday Card Workshop

I've decided to add some more cards from Holiday Card Workshop 2013 homework assignments, Day 3. My word dies arrived, and I LOVE them! This post shows my favorite card so far:


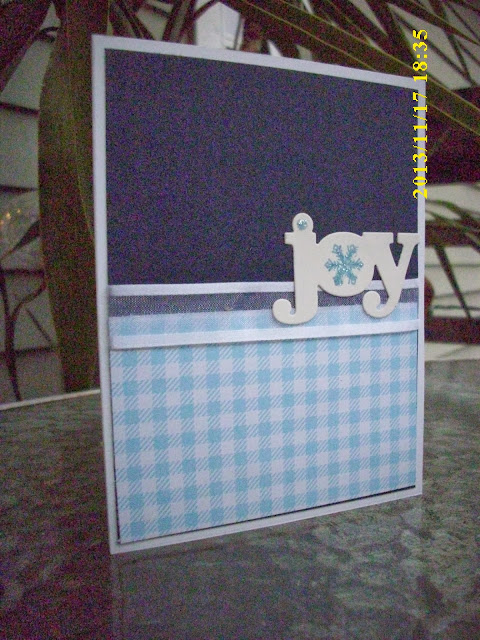
The navy cardstock, designer paper and ribbon are all from Gina K Designs' Season's Greetings Stamp TV kit, and the word die is from WPlus9, purchased from Simon Says Stamps (my Christmas present to myself). I absolutely love this card -- the word diecut, the paper, and the ribbon! I think I finally found a Christmas card I'd enjoy creating in multiples and sending out. WooHoo!

Thanks for stopping by. I appreciate your comments very, very much--they keep me going, believe me! If you're from Online Card class (well, even if you're not!), I enjoy seeing your creations and look forward to seeing more. Hope you've had a good weekend, and I will see you again soon!

Saturday, November 16, 2013

Holiday Card Workshop 2013 Bonus Day

Today we were shown some cards created by teen crafters. This is my take on a card created by Tanner Bell. I layered a piece of paper with a red and white design on the card first, then cut out part of the design from a second piece and layered it on top. I added Stickles to create some sparkle. The sentiment was added on top of a piece of ribbon across the bottom of the card.

I have wanted to create this card ever since I saw an example using the same paper in a card magazine several years ago! Today, after seeing Tanner's card, I finally had the motivation to do it. Obviously, the design is a little different than your typical Christmas card, but I like it.

Here is a close-up of the piece I put on with pop dots:
Thank you for stopping by! I appreciate your comments very much. As you know, they serve as a great motivator to keep on creating, even on the most challenging of days. Hope you are having a wonderful weekend. See you again soon with another card from class!

Friday, November 15, 2013

Holiday Card Workshop 2013 Day 3


For today's class we were shown an example of a card with the images stamped on an angle, like this. I used paper and stamps from Gina K Design's new Season's Greetings Stamp TV Kit. Love this snowman! Colored slightly with Copic markers and added a strip of paper across the angle before tying on a piece of Baker's Twine with a bow.

Thank you so much for stopping by! I love reading your comments, and it is good to see some familiar people out there from former Online Card Classes. I am thoroughly enjoying your cards, too! Please come back soon. Have a good weekend!

Thursday, November 14, 2013

Holiday Card Workshop 2013 Day 2


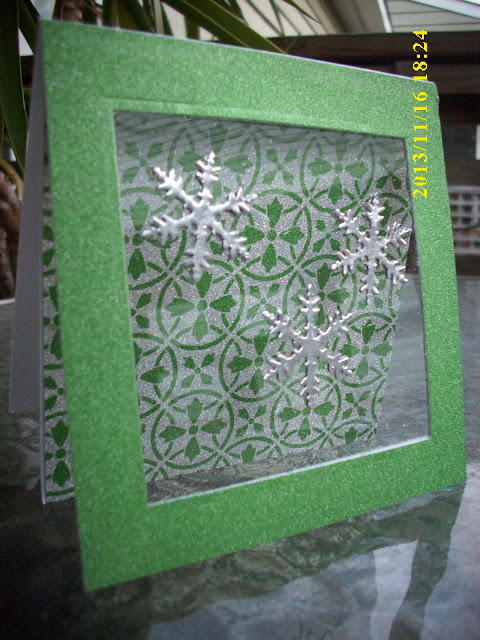
For the second day of the Holiday Card Workshop, we learned how to "suspend" snowflakes on our cards.  Stephanie Klauck provided a video on three different ways to do it, and here are my takes on two of them. The picture above shows the snowflakes dangling in open space, connected by fishing wire that's adhered on the top and the bottom of the square. I added a small frame around the square for appearances.

The below shows you how I glued the snowflakes on a clear transparency, both front and back, so they appear to be in mid-air on the card. I added an extra piece on the inside with the designer paper on one side that opens to blank paper on the other side so you have a place to write a message.


Here's another card I've added that's just like the first one, but different paper:


Thank you for stopping by! I enjoy your comments very much--they motivate me to keep going, even on the most challenging days of class!

Tuesday, November 12, 2013

Holiday Card Workshop 2013 Day 1

 More cards from Holiday Card Workshop (Online Card Class)! This is going to be so much fun, but you might grow tired of seeing more Christmas cards by the time the holiday actually gets here!

You've seen this penguin before. He's from Gina K Designs and I just love him with his glistening snowball! Anyway, the inside of this card has a pocket for a gift card, but my picture of it didn't turn out very well so it's not posted here. The strips of red with white polka dots is actually Washi Tape cut in half it's original size. The Merry Christmas sentiment is from Stephanie Barnard's Stamps of Life.

Here's another penguin, but he's from Stephanie Barnard's Stamps of Life. I heat embossed him in black, then colored his package with Copic markers and added Christmas Red Stickles to the ribbon.
Here's the inside of what you see directly above. It's a nice, pop-up surprise when you open the card. I hadn't done one like this before, & I discovered it's not too hard to create. There's still plenty of room to write a message if you want.

Thanks for coming by! I'll keep posting, and I hope you'll keep looking! Don't forget to leave a comment. I read them every day -- they truly boost my spirits. Hope to see you again soon. Have a good day!

Folded Banner Card

Time for another Online Card Class -- Holiday Cards!!! WooHoo!

Today's first card is called a Folded Banner Card, and it has a banner that is supposed to start on the front and look as if it continues through the inside and across the fold. Well, my tree looked too little by itself, so I popped it up on the front of a Majestic Label, then used the banner across the inside of the card. The sentiment also says Peace but you can't see it due to the label. When the card is folded, all you see is Noel. What a surprise when you open it up!

This gorgeous glitter paper is from DCWV's Holiday Glitzy Glitter Stack...don't you just love it? Comes with all kinds of awesome designs and also some plain glitter paper in silver, green and red. It is the same paper stack I used on a couple of previous cards. Go look!

The image and sentiment stamps, as well as the inks, are from Stephanie Barnard's Stamps of Life. As you can tell, I enjoy her stamps and inks. If you are a member of her Stamps of Life Club (free), you can purchase her products at a very inexpensive rate. Check her out!

Thanks for stopping by. I'll have more cards to post today, so be prepared to come look! I love your comments -- they really make my day, so don't go without leaving one! Have a good day!

Saturday, November 9, 2013

You Melt My Heart

I think I'm starting to get a thing for Christmas penguins!!! I love this guy just as much as the other one, and I particularly love the glittery snowball in his hands. I enjoyed coloring this fella with Copic markers and embossing the sentiment. I also added Diamond glitter dots to the background paper to make it look like it's snowing on the card. This stamp set was a free gift, and I'm enjoying it immensely!

Thanks for stopping by. I enjoy your visits very much and enjoy your comments even more. You are special people to me. I hope you are having a wonderful, positive weekend. Come back soon!

Friday, November 8, 2013

More Christmas Previews

 This card uses an image from one stamp set and the sentiment from another by Gina K Designs. I love this background paper!!! You'll be seeing more of it, for sure. It's almost like plastic glitter and very easy to work with.
This card includes stamps and dies from Stephanie Barnard's Stamps of Life. I just love the candy stamp and the dies that go with it! That's going to be useful while creating cards for the holidays.

So sorry it's been a while since I last posted. I had camera issues...so frustrating! All is well now, so you should be seeing more creations in the near future. I appreciate your visit and hope you will leave a comment before you go. That means the world to me! Have a good weekend!

Saturday, November 2, 2013

Joy

Used this penguin stamp again for another Christmas card. I think this one is close to my favorite so far. Used Wishing You Joy stamp set for the image and Snow One Like You for the sentiment. Embossed the penguin in Memento Luxe Northern Pine green ink. Love that stuff -- so rich! Embossed the background in snowflake embossing folder. Layered in green. All stamps and papers from Gina K Designs--very high quality.

Thanks for stopping by! Please leave a comment before you go...you know how much they mean to me and how they keep me motivated, so come on, talk to me!