Friday, September 27, 2013

Christmas Lights


Here are two views of the same Christmas card. I felt maybe the second one would be a little too dark, but it shows the beautiful shade of yellow for the cardstock base. I used two different kinds of glitter on these bulbs -- Marsha Stewart for the first and third, and a mix of some kind for the center bulb. I think they go well together, so I included all three on the card. The stamps are from Stephanie Barnard's Stamps of Life.

I am still trying out different types of Christmas cards I might want to use to the upcoming Holiday Season. Your vote counts, so be sure to include a comment and let me know what you think, good or not so good! Thank you!

Red and White, Insider's Day 3

 For Insider's Online Card Class Day 3, I pulled out a leftover die cut from an earlier class, layered it and re-inserted where it's been cut out on the cardstock. I love this red and white look. Personally, I think this is one of my better cards from this class, so far at least.
 Here's the inside. I added a vellum envelope and wrapped it in twine before gluing to the card. This will hold a gift card that should fit just right inside. There's not much room for a personal, hand-written note on this card, but I doubt that would be necessary. The gift card speaks for itself once it's inserted!
Here's the entire card at one glance. I'd like to add something red to the inside, but I didn't have red twine. Maybe I'll find something to add a little later when I'm ready to give the card. In fact, maybe I can find a red and white gift card! That would work! Ha!

Thanks for looking. Hope you enjoy this card as much as I do. Please don't forget to leave a comment before you go. You know how much that helps motivate!

Insider's Day 2

 Insider's Online Card Class Day 2. Here's the outside of the card, which I kept fairly simple. I stamped the Happy Birthday sentiment and added Washi Tape across the card in three places.


The inside of the card looks rather plain. I did not add the twine which would've helped these look like small packages. I just don't have the ability to wrap twine around such small areas. Anyway, this left more room for a personal, handwritten note on the inside.

This card was a tough one for me. I did NOT want to try it because I do not like to have to do a lot of measuring and cutting on good cardstock. By late last night, however, this was bugging me and I felt I had to give it a try. The class fever is catchy, and I think I've finally got it!

Thanks for stopping by. Please don't forget to leave a comment, good or bad, about the card before you go. It helps me learn and also motivates me to continue on this creative journey. Thank you!

Thursday, September 26, 2013

Clear Card

This card was created for our second day of Online Card Class Insider's. This has been tough for me so far, and it's only the second day! I never posted one for the first day, in fact!

I used a clear card from Close To My Heart and layered patterned paper on the inside, then put a piece of blank white cardstock on the back to cover any adhesive marks. The very front has a label that says "Happy Birthday" and the inside has the same that says "To You."

Hope you like today's card. There will be more as the week progresses, and they should be quite different from my usual CAS cards because this class is taking me way out of my comfort zone! Please leave a comment before you go and let me know what you think. It means a lot to me!

Monday, September 23, 2013

Joyous Penguin!


I decided it was time to test some Christmas cards for the coming Holiday Season. It will be here before you know it, and I want to be prepared.

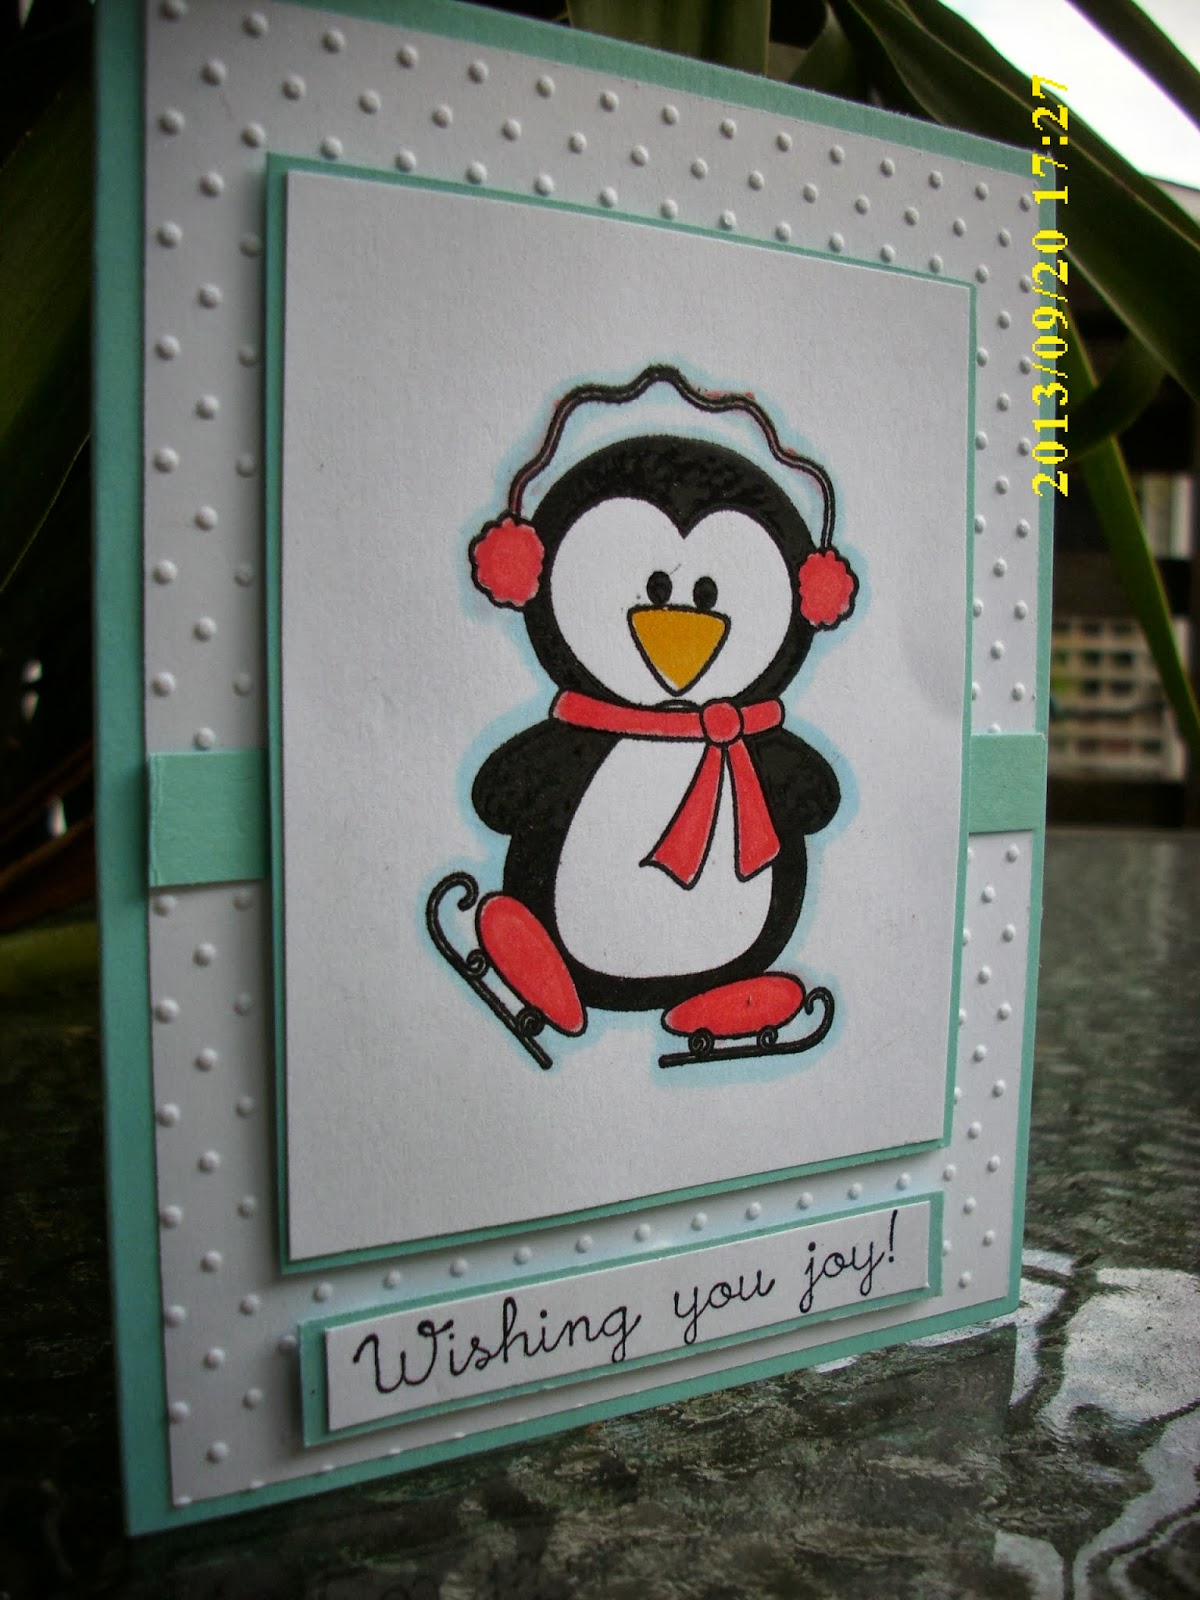
So, what do you think? Do you like this fella? He's one of my favorites. I entered this card into a challenge at Gina K Designs where we were to use both types of embossing -- dry embossing and heat embossing. I used dry embossing for the dotted background that I thought might give an appearance of snow. Then, I used VersaMark Black Ink for the penguin and heat embossed that. You can't tell very well from the pictures, but that fella is smooth as stone! He's adorable! I colored his ear muffs, scarf and skates with Copic markers, then outlined in a very light blue for a glowing effect. I love the light blue paper for the background. That's one of my favorites. Good thing, since I have a whole pack! Hate to admit it, but that wonderful paper is going fast. Anyway, I felt it was good to give the feeling of a cold winter and it's close to the same color I used to outline.

Thanks for looking. I know it's a little early for some of you to be looking at Christmas cards, but for those of us who create our own, it's time to begin creating cards to celebrate the special season! Please don't leave without leaving a comment. I'd really like to know what you think of this card, because if it's popular, I might make more. Thank you!

Halloween!


I thought it was about time to post some Halloween cards on here, since I'm making a few Christmas cards already as well. These were made using Stephanie Barnard's Stamps of Life stamp sets and also her inks. The fence is made by Sizzix, and the cat is made by Inkadinkado, but the rest of the stamps are Stephanie's.

Thanks for stopping by. I hope you are enjoying these Halloween cards as much as I enjoyed creating them. Please leave a comment before you go so I'll know how I'm doing. Thank you!

You're a Dear!

This card was fun to make! I found an old stamp set (don't know the brand) and began stamping away. Since it included animals, I decided it should go on a wood background, so I stamped that first. The colors were selected according to the required colors for the Color Challenge at The Outlawz. The "twist" was to sponge or distress some part of your card, so I distressed around the oval with the squirrel.

Thanks for stopping by! I have lots more cards to add, so keep looking! Don't forget to add your comments. That's important, so I'll know how I'm doing. Thank you!

Wednesday, September 18, 2013

Grapes

This card was made as a Thank You to a dear friend who sent me the stamp. She's awesome! I colored the grapes with Copic markers, cut it into circles and layered. Finally, I added a paper bow made with a bow die (one of my favorite dies!).

Thanks for looking. I appreciate you stopping by and leaving a comment. Have a good day!

Tuesday, September 17, 2013

Fall Tag

This card was created for a challenge at Gina K Designs where we were supposed to include something that's hanging on the card.  I created a Fall scene on a tag and connected it to the top piece of patterned paper. Inks used include Stephanie Barnard's inks and Tim Holtz Distress Ink in Red Barn. I colored the pumpkin with Copic markers.

Thanks for stopping by today! Please leave a comment before you go--it keeps me motivated!

Thursday, September 12, 2013

Layered Stitches

This card was created using one of my favorite stamp sets from Gina K Designs, Elegant Elements. Full of designs, I chose three to put on this card, inked in black, cut out and layered onto black cardstock die cut circles. Then I layered that onto Pool Party cardstock, layered on black.  I added stitched ribbon around both background layers and then added the sentiment from Bold and Beautiful, also from Gina K. Designs.

I will enter this card into the Stitched Challenge at Gina K Designs, too.

Thanks for looking! Please don't forget to leave a comment before you go and come back soon!

Wednesday, September 11, 2013

My Heart Sings!

This card was created for a challenge at Gina K Designs that's to include stitching. Fortunately, the stitching can be faux stitching or even stitching already on a ribbon, as you see here. I am not one to stitch anything anymore (used to cross stitch) but I admit, the ribbon looks better with it!

Thanks for stopping by. Don't forget to leave a comment before you go. Hope you are having a good week!

Sunday, September 8, 2013

Fall!

Here's another card with this gorgeous tree designed by Theresa Momber at Gina K Designs. Their Saturday Chat Challenge was to create a Fall card. Well, I've created many of those these past few weeks, perhaps a bit early, but here's another one! This time I added different colored leaves and included a small rake at the bottom of the tree. I think I like this one the best! All the colors seem to give it a boost unlike the others.

Hope you had a good weekend. Take it easy, and don't forget to leave a comment before you go! Thank you for stopping by.

I Miss You!

This card was created, as Guest Designer for the month of September, for The Outlawz Color Challenge, where we were to use red, blue and brown to create a card for a male. I think this does it, don't you? It is another Clean & Simple card, with chevron stamped on the tag and the sentiment heat embossed on the red piece of card stock. I added stars and a heart for some slight bling. No glitter...nothing fancy. Just a simple card for a male.

Hope you like it! Please visit us online at The Outlawz and take a look at all the beautiful creations. There's a new challenge every day!

Thanks for stopping by. Please don't forget to leave a comment before you go. Have a good week!

Wednesday, September 4, 2013

Simplicity

This is the ultimate Clean and Simple card! I am entering this into the challenge at Gina K Designs where we were to use dark colors. I used Tim Holtz Fired Brick Distress Ink for this and layered it with red and black papers. I added the three small (tiny, actually!) dots below the sentiment to add a little bling. The card is quite simple but I love it!

Thanks for stopping by. Thank you for your comments -- I love it when you leave a quick note to say Hi! Have a good day!

Tuesday, September 3, 2013

Red!

I enjoyed creating this card for Gina K Design's challenge where we were not allowed to use any light, pastel colors. This card included several distress inks from T. Holtz but none were light! The result of the mix was this beautiful red color, and I love it!

Thanks for stopping by today. I appreciate your comments, and they motivate me every day to continue on this creative journey. Take it easy!

Monday, September 2, 2013

OWH Challenge 9 - FINALLY!

This is the final card for the two-day event with Operation Write Home--their Labor Day Weekend Virtual Card Making Party, to be exact. This has been a whirlwind of constant card making, and I've enjoyed every moment of it.

This is a very, very Clean and Simple card. Our requirement was to include an image in a punched out or cut out window on the card. I punched out the circle and stamped a beautiful butterfly, including a stamped sentiment on the front. I used stamps from Gina K Designs and the sentiment from Hero Arts stamp set for Operation Write Home.

Thank you very much for including me in your time, as I've posted continuously for the past two days. I appreciate your visit! Please take a moment to leave a comment -- that really motivates me to continue on this creative journey. Thank you!

OWH Challenge 8

The card for Operation Write Home's Labor Day Weekend's Virtual Card Making Party's eighth challenge is very Clean and Simple. The requirement was to include bees, so I included one on the outside and one still swirling around on the inside, which you cannot see.

Hope you like this card. I'm nearing the end of the challenges, so I thank you for enduring these two days of non-stop challenges with me. Please take a moment before you go and leave a comment so I will know you've stopped by. Thank you!

OWH Challenge 7

The seventh challenge for Operation Write Home's Labor Day Weekend Virtual Card Making Party is to include Fall images, such as leaves. I used patterned paper from Gina K Designs, as well as stamped images of acorns and a sentiment.

Hope you like this seventh card for the Labor Day celebration with OWH as much as I am enjoying creating all these cards. Please take the time to leave a comment before you go. Thank you for the motivation to continue on this creative journey!

OWH Challenge 6

Hope you like this one. I've colored a Stampin Up! image with Copic markers, adhered to torn paper and lined the yellow card with turquoise (although it appears to be blue here) paper.

Thanks for looking! I'm off to the next challenge...don't forget to leave a comment. Appreciate it!

Sunday, September 1, 2013

OWH Sketch Challenge


This is the Sketch Challenge for Operation Write Home's Labor Day Weekend Virtual Card Making Party. For this card, we were to follow a specific sketch, with measurements included for each piece of paper used. I didn't like it at first, but now that it'd done, I like the card better.

What do you think? This is new paper from Stampin Up! and I love it. The sentiment is from a Hero Arts Stamp for Operation Write Home.

Thanks for stopping by. I appreciate your comments and hope you have a wonderful Labor Day weekend!


OWH Challenge 5

For this challenge (for Operation Write Home's Labor Day Weekend Virtual Card Making Party) we were to cover a block with tape and then ink it before stamping onto cardstock. You could either place the paper on top of the block to ink or stamp in the normal fashion. I tried it both ways and decided the regular way of stamping showed a preferable result. I inked with Hero Arts Tide Pool Shadow Ink and then stamped the image and sentiment in black.

This was more fun than I anticipated, and I like the result. Thanks for stopping by to take a look! I appreciate your comments very much, and they motivate me to continue traveling on this creative journey. Take it easy!

OWH Challenge 4

This was for OWH Virtual Cardmaking Party's fourth challenge, where we were to follow a sketch and include a sentiment about love. I'm sure soldiers miss their loved ones, so this is what I came up with.

Thanks for stopping by! Please don't hesitate to leave a comment so I'll be motivated to continue on this creative journey. I love making cards for soldiers who serve our Country!