Monday, May 2, 2016
Clear & Sheer Class Day 4
Hello everybody! I'm here to share with you my fourth day of homework for Clear & Sheer Online Card Class. It's taken me a while to get anything posted because the card was so tricky, I had to take a few days to get it together!
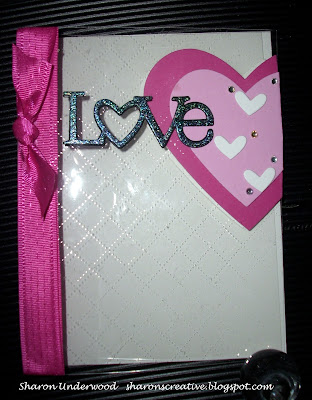
So sorry about the poor photograph. Since this card is made with clear plastic (& this is a cloudy day with no sunshine for the camera shot), it was hard to get a picture without glare from the flash. I put a piece of white cardstock behind the card so it would show up, but the actual card is clear. As you can see, this stuff was hard to work with without getting finger prints on it. Because it was thin, it also kept bending. UGH!
Following a video by Jennifer McGuire, I first embossed the front of the card with a stitched diamond shape. Can you see it? Look again -- it's there! Anyway, it took about 3 tries to get it to show up even when it was right in front of me. Time for new glasses? I sure hope not! I prefer to think it was just the plastic giving me a hard time with the embossing folder.
I die cut a large dark pink heart (using dies from SU!) & adhered it on the inside of the front flap of the card. Then I added the smaller, lighter pink heart on the outside, along with the smaller hearts and the sentiment. Finally, I added some bling from my stash along with some ribbon. The inside of the card, as well as the back, has the same size hearts (in white) attached to the card so there's a place to write a few words. It also has YOU stamped on the inside.
Just a quick note about the sentiment. Can you see the sparkle? Again, following Jennifer's fantastic instructions, I put VersaMark on black cardstock then poured Kaleidoscope embossing powder (from Stampendous -- a very old jar!) on top and heat embossed it before die cutting the word. It turned out differently than expected because it kind of has blue and purple tints to it, which I didn't want. Her instructions said to cover this with Glossy Accents, but I was totally DONE with this card by then & didn't do it. After layering the LOVE several times before adhering, I thought it was puffy enough.
Well, I hope you aren't bored with my commentary by now. I think I'm done, except to say I really appreciate your comments and visits! Your kind words mean the world to me, as does any critique or suggestions you may have. You'all keep me going!
Hope to see you again real soon ~ maybe Wrap-Up Day will include suggestions for another card!
Subscribe to:
Post Comments (Atom)


That's so cool! I can see the embossing, it's very pretty! I must say I would give you all A+ for your homework! :) Great class, great cards!
ReplyDeleteWELL DONE!!! I can see the pattern on the clear, and yes, it's a bugger to photograph. I love what you have done here, I agree with Donna....you get an A+!!!!
ReplyDeleteI'd give you an A ++++, for the card and your patience! Very pretty!
ReplyDeleteA+ and a big WOW!! this is beautiful and the embossing shows very well. I agree that photographing plastic is a bugger and it is difficult to handle without getting finger prints on it.
ReplyDeleteWonderful card! You took this class by storm!!
ReplyDeleteBeautiful, Sharon!! I can definitely see the embossing and that glittery love sediment? I love it!! I hope you are doing well with your recovery! Hugs, Darnell
ReplyDelete