Friday, November 20, 2015

OCC Holiday Style.Day 9


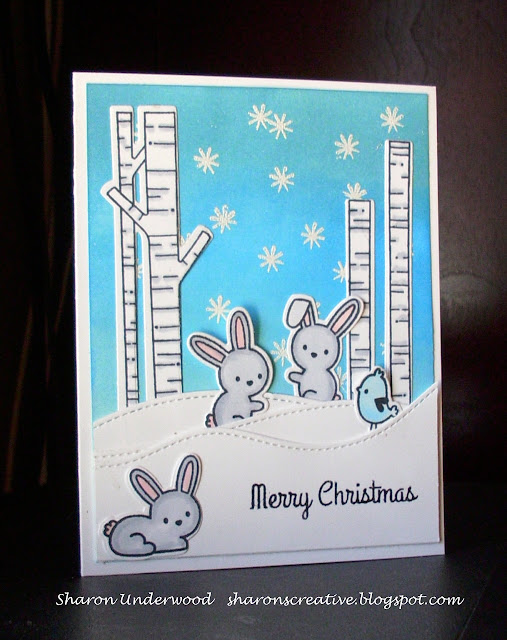
Hello again! How are you today? I've been playing with my stamps again, trying to catch up on homework for Online Card Classes Holiday Style. Today's card is for Day 9, and the focus is Soft and Subtle.

This card I created is as soft and subtle as I could get. By using Distress Inks for the background, I was able to keep it light. The birch trees, bird and bunnies were colored with a touch of  Copic markers, and the sentiment was heat embossed in black.

The two stamp sets used are from Lawn Fawn and were purchased a year ago. Although I've created several cards so far this year, I've never forgotten these sets and was excited to use them. With the focus on Soft and Subtle, I felt this was the perfect time because I could keep the background and the images light and soft.

Thank you for stopping by today! I appreciate your comments and visits VERY much, and I hope to see you again real soon! It's already time for another day of homework, so I'll be back before you know it.


Thursday, November 19, 2015

OCC Holiday Style Day 7 Card 3


Hello everybody! I'm here with a third card for Day 7 at Online Card Classes Holiday Style. I just HAD to try this after seeing the video lesson by Carissa Wiley called Glimmer Die Cut Toppings. It obviously took me a while (we're now on Day 10!) to get it done to my satisfaction. Once I cut back on all the elements I was trying to put on it, I was happy.

The stamps and dies I used are from Reverse Confetti, and I love the style of the sentiment. After die cutting the word JOY with white cardstock, I added a die cut layer of fun foam and another piece cut in black behind it so it would pop up some and there would be a slight shadow. I also sponged some red ink on it and then used my Wink of Stella pen so there would be some sparkle.

That was a lot for one little word, but it really helped the card. I die cut some holly leaves purchased from Gina K Designs and put them behind the sentiment. The rest of the phrase was heat embossed in white onto black cardstock and added on top of a strip of Washi Tape I got from Stampin Up! All of this was layered onto green cardstock before putting onto a white cardbase.

This is one of my favorite cards since it's CAS and can be reproduced easily. I'm not sure how well it would hold up in the mail, however, since the JOY has a layer of fun foam. What do you think?

Thank you for stopping by today! I appreciate your comments and visits VERY much, and I hope to see you again real soon. Now I'd better get back to my homework for Day 9!


Monday, November 16, 2015

OCC Holiday Style. Day 7, Card 2

Hello again everybody! I'm back with another card from Day 7 with Online Card Classes Holiday Style.

For this lesson by Kristina Werner on our "Shimmer and Shine" day, I got out some Sparkle Texture Paste by in a pretty Ocean Spray color that I've been anxious to play with. Using a stencil called Pointed Star by Jenni Bowlin, I spread the paste over the stencil and then let it dry. Using cardstock by Stephanie Barnard's Stamps of Life, I cut a piece that would fit across the card front and added a die cut sentiment by Confetti Cuts. Behind the piece of cardstock, I added half a snowflake on the far right. Finally, I die cut a strip from Cheery Lynn's Alison's Ribbons die and added it across the front.

I wish you could see the shimmer from the Sparkle Texture Paste! It's really pretty!

For the inside, I added a sentiment by Gina K Designs from her latest Stamp TV kit, Sparkling Christmas and then added a few small, stamped snowflakes in Turquoise Sea ink to match the cardstock.

That's it for today's cards. I might add another one tomorrow, but for the rest of the evening, I'm taking a break.

Thank you for stopping by again today! I appreciate your comments and visits very much, and I'll see you again real soon ~


OCC Holiday Style Day 7, Card 1


Hello everybody! How's your day? I'm here with another homework assignment from Online Card Classes' Holiday Style. This is for Day 7. (Did you notice yet we skip a day in between?) I loved the lessons for today, as I found them doable with the products I already own. Yippee!

Todays focus was "Shimmer and Shine." As soon as I saw the lessons, I pulled out the gold-striped cardstock I bought from Hobby Lobby that's by Paper Studio. It's full of gold-embossed cardstock that is out of this world! I also have some shiny gold paper from DCWV so I grabbed that, too. I was READY!

Following the lesson by Yana Smakula, I die cut a holiday sentiment by Tim Holtz on the gold striped cardstock and then layered it onto the gold paper. The sentiment shines through. I added a gold cord (from Gina K Designs), tied in a bow. That was put onto GKD Pure Luxury White cardstock for the card base. For the inside, I added a sentiment by GKD from her latest Stamp TV kit, and layered that onto gold paper. The card is very elegant and is shiny with gold throughout.

These lessons are a lot of fun, and I always learn so much. I encourage you to look into taking them, as you can start at any time and go at your own pace. You can find them at onlinecardclasses.com.

I'll have another card posted in a short while that's also from today's lessons, so stay tuned!

Before you go, I've got to give a big shout-out to my friend, Kevin, who designed the Thanksgiving banner you see above. Last year, we designed a banner for each holiday throughout the year, and this was one of them. Thank you, Kevin!

OK, that's it! Thanks for stopping by! I appreciate your comments and visits very much, and I hope to see you again real soon ~


Friday, November 13, 2015

OCC Holiday Style Day 5

Hello! It's me again...returning with another card created for Holiday Style Online Card Class! This is Day 5, so I think I'm caught up now. Yay!

Today's card was to be "Cute and Whimsical." I didn't really follow anyone's video in particular, but rather a combination of what I've seen in recent blogs.

Kristina Werner had this wonderful combination of Tim Holtz inks sponged onto white cardstock for a nighttime sky in one of her Holiday cards. It included Antique Linen, Victorian Velvet, Seedless Preserves, Chipped Sapphire and Black Soot. I tried it, but it took me forever to get enough sponging done for anything to blend. I held onto that piece of sponged cardstock for several days until today's lesson came up.

I have also seen this W Plus 9 stamp set, called Holiday Hugs, in several recent blog posts. With today's theme as Cute and Whimsical, I put what I've learned all together into this one, sponged card.

The snowy background was created by heat embossing in White the stamp set by October Afternoon called First Snow. I die cut the W Plus 9 images and then popped them up onto the sponged and snowy background. I layered all this onto Wild Lilac cardstock by Gina K Designs before adding to a Pure Luxury White Heavy Weight Base cardstock, also by GKD.

Today's card came easily since I'd already spent several days reviewing lessons, videos and blogs full of whimsical Christmas cards. I didn't even know this lesson was coming up while watching and reading all that, but it helped me put together today's card in one afternoon. That's unusual for me!

Thank you so much for stopping by today! I appreciate your comments and visits very much, and I hope to see you again real soon ~ probably won't have another post for a couple days, so sit back and take a break until my return!


Holiday Style OCC Day 3

Hello everybody! How's your day coming along? I'm catching up on some homework for Holiday Style Online Card Classes.

Today's card was a CASE from Kathy at the Daily Marker. The stamp set is from a Hero Arts Monthly Kit and includes lots of 3-step stamping choices. For my card, instead of stamping all three steps on the background images, I just stamped one and used the lightest ink provided in the kit. Then I added the berries in the lightest green. I matched that green for the base layer of the card. For the sentiment, I heat embossed it onto vellum and added a die cut poinsettia with the leaves.

Thank you for stopping by today! I appreciate your comments and visits very much, and I hope to see you again real soon ~ there's plenty more homework coming!


Thursday, November 12, 2015

For Unto Us...

Hello everybody! I'm still trying out a few Christmas cards in between doing OCC Holiday Style homework.

This card was another one created with a die, paper and ink. I used a stamp set from Stephanie Barnard's Stamps of Life, and there's more of the verse on the inside of the card. It's important to me to include a message on some of my cards that reflects my faith.

I know exactly who this card will go to, although I doubt I'll make more than one. It's very hard to get all the little pieces out of the snowflakes after I die cut it. I use Sizzix adhesive paper with the cardstock, and everything sticks really good. (well?)

Hope you like another blue and white Christmas card! I love it, and I have lots of navy cardstock, so I might make more with the same color scheme (but without the snowflakes). I've gotten lots of positive comments here about it, and that helps considerably.

Thank you for stopping by! I appreciate your comments and visits very much, and I hope to see you again real soon~maybe I'll get another day's homework done!


Tuesday, November 10, 2015

Holiday Style Online Card Class Day 1

Hello everybody! It's time for a new Online Card Class! This one is called Holiday Style, and it's full of Christmas card ideas.

For homework from Day 1, I chose to create a card based on a video lesson by Laurie Willison. The card is scored every half inch until the bottom third of the cardstock. That is sponged with TH Fired Brick ink and heat embossed with an image and sentiment.

I used products from Gina K Design for this card. The stamp set is called Peace and Joy and is illustrated by Theresa Momber, one of my special friends at GKD. You can barely see the scoring on this card, but it's there. I think it looks a little bare on the middle an top, but I'll admit, the card is growing on me.

Thank you for stopping by today. I appreciate your comments and visits very much, and I hope to see you again real soon ~ there will be more homework to post, so stay tuned!


Sunday, November 8, 2015

Navy Blue Christmas

Hello everybody!!! How was your weekend? It's a cold Sunday here in North Carolina, but I love it. Time for leggings and sweaters.

Today's card is CAS style. All I really had to do was die cut the image and sentiment (one die), layer onto blue and white cardstock, then add the ribbon and some glitter and I was done! I really love everything about this card. It's simple to make, and I love navy and white together. The silver bow was the final touch.

I found the Memory Box die at Simon Says Stamp; the ribbon from Stampin Up!; Navy Blue cardstock from Stephanie Barnard's Stamps of Life; and the Pure Luxury White cardstock from Gina K Designs. Put together quite a mix there!

This is one card I could duplicate easily, so it's in the running for this year's Christmas card. What do you think? It could be the same design but different colors.

Thank you for stopping by today. I appreciate your comments and visits very much, and I hope to see you again real soon ~


Wednesday, November 4, 2015

Peace

Hello everybody! I'm here with another Christmas card. After a couple weeks of trial and error, I've come up with a few cards that will be under consideration for duplication. You'll see more of these in the near future. Like I said previously, I'll need about 50 cards. While I don't want to create 50 different ones, I don't want to duplicate too many, either.

I started by stamping a Hero Arts Background Stamp in Gina K Designs Kraft Ink on Pure Luxury Ivory Cardstock. I wanted to keep it soft so it didn't overpower the image on top. For the image, I stamped and die cut a Sizzix Christmas ornament and layered it on top of a piece of GKD ribbon. The whole thing was layered onto Christmas Pine and Kraft Cardstock.

This card does not use typical Christmas colors, but I think it will work well for a masculine holiday card. I'll keep playing with this Sizzix set of stamps and dies and see what other colors I could combine.

Thank you for stopping by today! I appreciate your comments and visits very much, and I hope to see you again real soon ~